Posts

Image
  9th Week Homework  Part 2 Calendar – Calendar CSS Formatting Regarding the 9th-week homework, there's a requirement to include background text, caret icons on both the left and right sides of the calendar month, enhance the current-day cell with icons and color, insert customize icons on the date, and integrate post-it notes settings from the previous calendar lesson. To assist with this, I've included notes and provided images of the relevant code snippets for your reference. Let's tackle this task together to ensure a comprehensive understanding and successful implementation.  To begin, insert the following codes under the <style> <head> <body> in the existing code from the previous lesson. Ensure to update the year from 2020 to the current year. CSS Setting Code After inserting the initial codes, make adjustments to the CSS settings using the provided codes in Visual Studio Code. Depending on personal preferences, both numbers, font-size, ...
Image
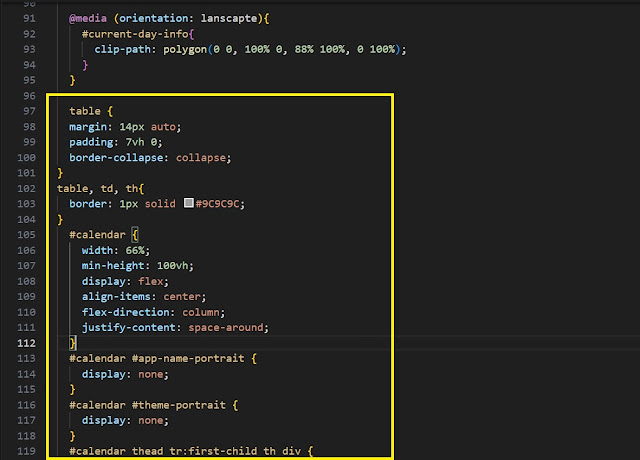
8th Week Homework  Part 2 Calendar – Calendar CSS Formatting This week's homework involves adjusting format settings on the previous calendar lesson to enlarge the calendar body size, font size, and weight, as well as altering vertical alignment, padding, and transition of numbers for the right-side calendar. To achieve this, it is necessary to add some code to ensure the process runs smoothly based on last week's work. Let's examine and go through this together. Firstly, insert additional codes after @media (orientation: landscape) to finely adjust the mini calendar table. This includes modifications to the table's margin, padding, border-collapse, and color of the border, aligning with the specifications outlined in Figure 1. Figure 1 : CSS Formatting   Secondly, enhance the appearance and interactivity of the calendar table body and numbers by implementing code that makes them stand out and pop out when the mouse cursor hovers over the element. This involves s...
Image
7th Week Homework  Part 2 Calendar – Right Column DIV This week's homework is to add a new column to the right side of the previous calendar lesson. The process to create this right column involves inserting a few lines of code into the work from the fourth week. Let's review and inspect this together. The code in Figure 1, Figure 2 and Figure 3 are from the previous lesson, and it is used to create the left side of the calendar column, resulting in Figure 7 (the last figure on the page). On the other hand, the code for the remaining figures, numbered 4 to 6, is used to generate the right side of the mini calendar column. It includes numbers for the days and the seven-day names: Monday, Tuesday, Wednesday, Thursday, Friday, Saturday, and Sunday. Please refer to the final result on the last page for clarification. Fig:1 Left Column Codes on Visual Studio Code Fig 2 : Left Column Codes on Visual Studio Code   Fig: 3 Left Column Codes on Visual Studio Code 2 Fig: 4 Right ...
Image
4th Week Homework   This week homework is to use a clip-path method on "My Calendar" to create a different shape while writing the following codes on Visual Studio Code application. Codes on Visual Studio Code   Clip-path result    
Image
 3rd Week Homework           This week homework is about to do some changes of the previous assignment as adding font color, words alignment and numerical sign changes on the schoolwork that I have uploaded in a few days ago. Let's not waste any time and begin immediately.      Firstly, you may need to type below codes on Visual Studio Code application and do some customize data on line 12,14,18,22, and more. For changing background font color, click on the color block to edit color as preference.      Secondly, will change default cursor, text align, background color, border color and off-color as shown in figure.       Lastly, save the codes after writing on the application and run to check the final result on the website. According to the writer perspective, the codes are tailoring and adjustable. Image 1 Image 2       Image 3  

TUTORIAL OF CREATING A BLOG ON WEBSITE

Image
  Assignment of Web Front-end Interface Design Tutorial to Create Personal Blog   27 September 2023   For creating a personal blog on a blogger page by using a code, the following steps are the important footstep to comply with.  Step 1:  Before writing a code, need to create a file on Visual Studio Code page as:  click "New file" > on Visual Studio Code > type " index.html "   Visual Studio Code page    Step 2: After pressing Enter button, there will show a screen of place to create a folder for saving codes as personal preference area on computer.   Press Enter > File name: index > Folder name: 0927 (customize) > click Create File     Step 3: Then, there has a cursor to type codes for creating a page. Herewith example codes with a demonstration page for a reference.   Visual Studio Code page   Codes on Visual Studio Code page Step 4:  On Step 4, need to save codes on a folder where is creat...